
Introduction
One handy feature of Dynamics 365 is the ability to filter lookup fields on a form. While this can be done with system views, like when you only want users to choose an active contact, you can also filter based on other lookup fields in the form. For instance, on an opportunity, you can filter a contact lookup to only show contacts belonging to the same account as the opportunity. Being able to filter lookup fields based on other information in a form makes it easier to ensure users enter valid, relevant data.
Unfortunately, you can’t use the main interface to set up a filter for a many-to-many relationship between lookup fields. If you’ve ever tried to filter a user lookup field based on their team, you’ve likely run into this issue.
While there aren’t any features in the typical interface, other options exist. In this article, we will look at how to set up and apply lookup filters through JavaScript using the addCustomView function.
Scenario
In our example, we’re going to look at a database for a school system. This system tracks the classes taught at the school, the teachers working there, and what’s being taught throughout the day.
A teacher can teach many classes, and a class can be taught by many different teachers, forming a many-to-many relationship. Each class period has one teacher and one class, forming one-to-many relationships. When setting up a new class period, once a class is chosen, users should only be able to select teachers who can teach that class.
Overview
To filter the teacher lookup based on the class period’s class, we’re going to add a function to our web resource that will trigger when the page loads or the class changes, applying our custom filter using the addCustomView function:
[control].addCustomView(viewId, entityName, viewDisplayName, fetchXml, layoutXml, isDefault)
Let’s take a quick look at the parameters:
- viewId – A GUID unique to that view on the form. If the GUID already belongs to a view on the form, that form’s fetchXML and layoutXML will replace what is passed into the function.
- entityName – The logical name of the lookup field’s entity.
- viewDisplayName – The name of the view; what appears in the lookup field’s “Advanced Lookup” window.
- fetchXml – The fetchXML for the query – what filters are being applied.
- layoutXml – The layoutXML for the query – what columns appear, their order, width, etc. – the first two columns are shown in the lookup’s initial dropdown.
- isDefault – Whether or not to switch the lookup field’s view to the new view.
By the end of this article, your function should look something like this:
function filterTeachers(executionContext) {

  let formContext = executionContext.getFormContext();

  try {

    //Get the class being taught

    let classField = formContext.getAttribute("cr95c_class")?.getValue()?.[0];

    console.log("Class Field: " + classField);

    //If a class has been selected...

    if (classField !== null) {

      //Get its name and id

      let className = classField.name;

      let classId = classField.id;

      //Generate unique GUID for view

      let guid = "00000000-0000-0000-0000-123456789012";

      //Name of lookup field's entity

      let entityName = "cr95c_teacher";

      //Custom name for view

      let viewName = "Teachers That Teach " + className;

      //Fetch XML

      let fetchXml =

        `<fetch version="1.0" mapping="logical" savedqueryid="c2cf5996-4cbf-422e-955a-1b4f0fa4446a" no-lock="false" distinct="true">

         <entity name="cr95c_teacher">

           <attribute name="statecode"/>

           <attribute name="cr95c_teacherid"/>

           <attribute name="cr95c_teachernumber"/>

           <attribute name="createdon"/>

           <order attribute="cr95c_teachernumber" descending="false"/>

           <attribute name="cr95c_firstname"/>

           <attribute name="cr95c_lastname"/>

           <attribute name="cr95c_honorific"/>

           <filter type="and">

             <condition attribute="statecode" operator="eq" value="0"/>

           </filter>

           <link-entity name="cr95c_class_cr95c_teacher" intersect="true" visible="false" from="cr95c_teacherid" to="cr95c_teacherid">

             <link-entity name="cr95c_class" alias="aa" from="cr95c_classid" to="cr95c_classid">

               <filter type="and">

                 <condition attribute="cr95c_classid" operator="eq" value=${classId}/>

               </filter>

             </link-entity>

           </link-entity>

         </entity>

       </fetch>`;

      //Layout XML

      let layoutXml =

        `<grid name= "resultset" object= "10836" jump= "cr95c_teachernumber" select= "1" icon= "1" preview= "1">

           <row name= "result" id= "cr95c_teacherid">

               <cell name= "cr95c_teachernumber" width= "300" />

               <cell name= "createdon" width= "125" />

           </row>

       </grid>`;

      //If this is the default view

      let isDefault = true;

      //Field to update

      let teacherControl = formContext.getControl("cr95c_teacher");

      //Update teacher lookup field

      teacherControl.addCustomView(guid, entityName, viewName, fetchXml, layoutXml, isDefault);

      teacherControl.setDefaultView(guid);

    }

  } catch (error) {

    console.error("There was a problem filtering teachers. Please contact the System Admin.");

  }

}
1. Get Your FetchXML and LayoutXML
First, let’s get our fetchXML and layoutXML. The easiest way is to get these from a view. The fetchXML can be generated using either the modern or classic interface, while the easiest way to get the layoutXML is to go to the classic interface.
Create a view in Dynamics with the filters you’re looking to apply to the lookup field, including the filter that will be based on another field. In our case, since we want to show active teachers that can teach a chosen class, our filter will look something like this:
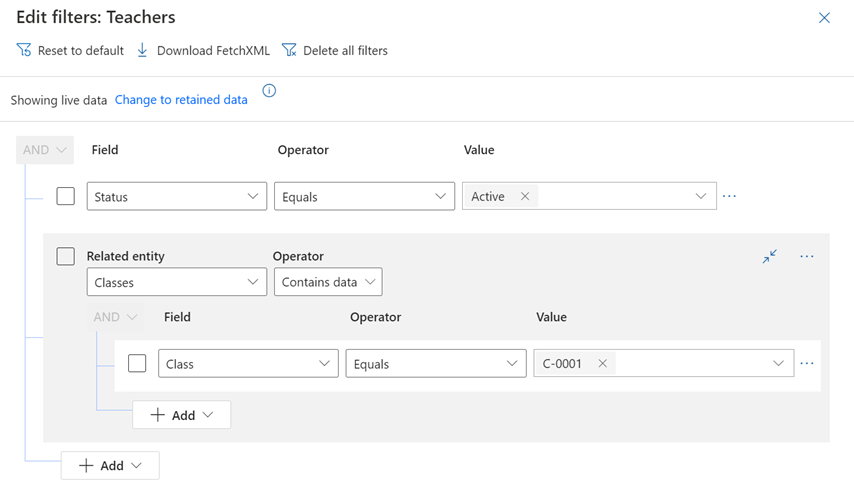
Once you have your view, click “Edit filters” and then “Download FetchXML”.
Your fetchXML should look something like this:
<fetch version="1.0" mapping="logical" savedqueryid="c2cf5996-4cbf-422e-955a-1b4f0fa4446a"

    no-lock="false" distinct="true">

    <entity name="cr95c_teacher">

        <attribute name="statecode" />

        <attribute name="cr95c_teacherid" />

        <attribute name="cr95c_teachernumber" />

        <attribute name="createdon" />

        <order attribute="cr95c_teachernumber" descending="false" />

        <attribute name="cr95c_firstname" />

        <attribute name="cr95c_lastname" />

        <attribute name="cr95c_honorific" />

        <filter type="and">

            <condition attribute="statecode" operator="eq" value="0" />

        </filter>

        <link-entity name="cr95c_class_cr95c_teacher" intersect="true" visible="false"

            from="cr95c_teacherid" to="cr95c_teacherid">

            <link-entity name="cr95c_class" alias="aa" from="cr95c_classid" to="cr95c_classid">

                <filter type="and">

                    <condition attribute="cr95c_classid" operator="eq"

                        value="{4b7f17ce-46cc-ee11-9079-000d3a376708}" uiname="C-0001"

                        uitype="cr95c_class" />

                </filter>

            </link-entity>

        </link-entity>

    </entity>

</fetch>
Save your FetchXML somewhere you can easily get to later.
To get the layoutXML, open Advanced Find in the classic interface. Use an existing view or add whichever columns you want to include and click “Results.” Once the query has run, open the Developer Tools and search for “layoutXML.” Cycle through the results until you find a <input> tag with a value starting with “<grid name=.” Copy the value and paste it into an XML file. Replace each instance of “"” with double quotes. By the end, it should look something like this:
<grid name= "resultset" object= "10836" jump= "cr95c_teachernumber" select= "1" icon= "1" preview= "1">

    <row name= "result" id= "cr95c_teacherid">

        <cell name= "cr95c_teachernumber" width= "300" />

        <cell name= "createdon" width= "125" />

    </row>

</grid>
If you need to make changes to the layout, you can add or remove <cell /> tags. The “name” attribute will be the logical name of the field you want to include.
2. Gathering Parameters
Open your web resource code and create a function that takes in the executionContext as a parameter and pulls out the formContext before a try/catch statement:
function filterTeachers(executionContext) {

  let formContext = executionContext.getFormContext();

  try {


  } catch (error) {

    console.error("There was a problem filtering teachers. Please contact the System Admin.");

  }

}
Next, get the field the lookup is filtered by and ensure it has a value. In our case, we’re going to get the “class” lookup field:
//Get the class being taught

let classField = formContext.getAttribute("cr95c_class")?.getValue()?.[0];

console.log("Class Field: " + classField);

//If a class has been selected...

if(classField !== null){   }
In this example, I’m using optional chaining (?.) to prevent the script from erroring out if the class hasn’t been selected.
Once we know the field we’re filtering by has data, we can create and add our custom view. Pull out the filtering field’s name and id:
function filterTeachers(executionContext){

  let formContext = executionContext.getFormContext();

  //Get the class being taught

  let classField = formContext.getAttribute("cr95c_class")?.getValue()?.[0];

  console.log("Class Field: " + classField);

  //If a class has been selected...

  if(classField !== null){

    //Get its name and id

    let className = classField.name;

    let classId = classField.id;

}
Next, we’ll define the needed parameters to create our view.
viewId
The viewId is a GUID stored in a string. If you’re just going to have one custom view, you can hard-code your GUID:
let guid = "00000000-0000-0000-0000-123456789012";
However, if you have multiple custom views, you may want to consider a way to generate a unique GUID each time. In our example, if we had a teacher and a substitute teacher, we would likely want two views: one for the full-time faculty who could teach the class and one for the substitute teachers who could teach the class.
One easy method to create a new GUID each time is to store the number at the end of the GUID in a global variable:
let guidNumber = 12345;
Then, whenever we make a new GUID, we can increase the value of the global variable:
let guid = `00000000-0000-0000-0000-${guidNumber.toString().padStart(12,"0")}`;

guidNumber++;
Since the GUID only has to be unique among views in the current form, we don’t have to worry as much about overlapping GUIDs.
entityName
Save the table name of the field being filtered:
let entityName = "cr95c_teacher";
viewDisplayName
Choose a descriptive name since this will appear in the Advanced Lookup window:
let viewName = "Teachers That Teach " + className;
fetchXml and layoutXml
For your fetchXML, copy your XML into a new variable. In this example, we’ll copy the XML into a template literal, so we don’t have to worry about line breaks and can more easily insert variables:
let fetchXml =

    `<fetch version="1.0" mapping="logical" savedqueryid="c2cf5996-4cbf-422e-955a-1b4f0fa4446a" no-lock="false" distinct="true">

        <entity name="cr95c_teacher">

        <attribute name="statecode"/>

        <attribute name="cr95c_teacherid"/>

        <attribute name="cr95c_teachernumber"/>

        <attribute name="createdon"/>

        <order attribute="cr95c_teachernumber" descending="false"/>

        <attribute name="cr95c_firstname"/>

        <attribute name="cr95c_lastname"/>

        <attribute name="cr95c_honorific"/>

        <filter type="and">

            <condition attribute="statecode" operator="eq" value="0"/>

        </filter>

        <link-entity name="cr95c_class_cr95c_teacher" intersect="true" visible="false" from="cr95c_teacherid" to="cr95c_teacherid">

            <link-entity name="cr95c_class" alias="aa" from="cr95c_classid" to="cr95c_classid">

            <filter type="and">

                <condition attribute="cr95c_classid" operator="eq" value="{4b7f17ce-46cc-ee11-9079-000d3a376708}" uiname="C-0001"

                uitype="cr95c_class" />

            </filter>

            </link-entity>

        </link-entity>

        </entity>

    </fetch>`;
Next, modify the XML to create a dynamic filter.
Within the link entity’s filter, take the <condition /> tag (highlighted above in blue) and remove everything between the value attribute and the end of the tag. Then, replace the value attribute’s hard-coded id with the id of the current filtering field – in our case, the class’s Id:
<condition attribute="cr95c_classid" operator="eq" value=${classId}/>
If there are any other conditions you want to add, you can add them to the filter above the link entities (highlighted above in green). You can either hard code them in or use a variable to hold the filter.
For your layoutXML, copy the XML into a template literal, and if needed, add any changes or variables as needed:
let layoutXml =

`<grid name= "resultset" object= "10836" jump= "cr95c_teachernumber" select= "1" icon= "1" preview= "1">

    <row name= "result" id= "cr95c_teacherid">

        <cell name= "cr95c_teachernumber" width= "300" />

        <cell name= "createdon" width= "125" />

    </row>

</grid>`;
isDefault
Since we want this to be the default view users see when selecting a teacher, we’ll set this to true.
let isDefault = true;
3. Adding the Custom View
Once you’ve defined the parameters, get the field you need to update:
let teacherControl = formContext.getControl("cr95c_teacher");
Finally, add the custom view:
teacherControl.addCustomView(guid, entityName, viewName, fetchXml, layoutXml, isDefault);

teacherControl.setDefaultView(guid);
Depending on how the form loads, the default view may not be the custom view you added. To remedy this, call the setDefaultView() function after adding the custom view.
Once you’ve built your new function, you can add it to form events such as when the page loads or when the filtering field changes. Publish the form, test the changes, and see how the dynamic filter is applied!
Summary
In this article, we looked at how to add a dynamic, many-to-many lookup filters in Dynamics 365 and model-driven apps. Here at TopLine Results, we can help customize your forms to fit your needs. If you ever need help customizing your forms or any other part of your database, reach out to us at info@toplineresults.com or call us at 800-880-1960.
You must be logged in to post a comment.