
One of the most useful tools in Wrike is its task function. You can create tasks and assign them to users as well as keep track of the status of all tasks. You also get a "My To-Do" list to quickly view all your tasks. Having the ability to keep track of not only what you are working on but others are working on as well is incredibly useful.
Tasks in Wrike also have an Outlook add-in that can assist you even more. The add-in allows you to easily track emails directly to your tasks. This add-in is available to all users of Wrike. In this article, I will be going over how to set up the add-in and use it.
Setup
To add Wrike to your Outlook, you need to go to the Get Add-ins button in your Outlook navigation.
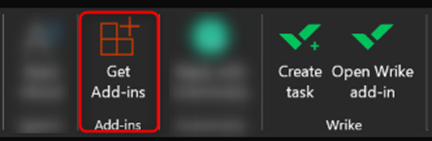
Once the Add-in window opens, search for "Wrike for Outlook" and click the add button. This will add the Wrike integration to your Outlook and allow you to create tasks directly from your emails.
Creating a Task
To create a task in Wrike, start by clicking on the Create Task button from the add-in.
The first time you do this it will prompt you to set a default location. The default location is going to be where your tasks will automatically go in Wrike when created. Once this is set it will create a task in Wrike using the email you have selected in your default location. This will add it to your “To-Do” list in Wrike, giving you more visibility for everything you need to do.
After adding the task in Outlook there are a few more actions you can take. One of the more important ones is "Add assignee". This allows you to assign the task to a user in Wrike directly from Outlook. If you assign the task to another user, it will appear on their “To-Do” list in Wrike.
You are also able to change the status of a task directly in Outlook. When a task is created, it will default to "In Progress". If you click on "In Progress" you can modify the status.
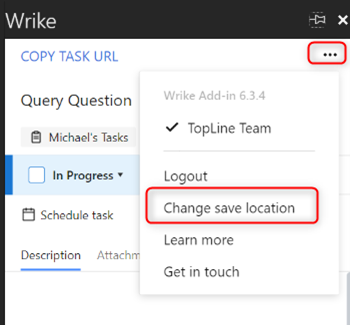
If you would like to change where you are saving the task you can change the default location for all tasks or change it for the individual task you are working on. To change the default location, click on the three dots in the top right of the add-in. Then click on "Change save location".
To change the save location for a specific task, click the X when hovering over the current save location and then search for the new location. You are also able to save to more than one location by hitting the plus button.

When creating a task on an email chain where a task already exists will ask if you would like to add the email as a comment to the original or create a subtask on the original. You do still have the option to create a whole new task.
When you select to add the email as a comment, it will be added to the original task. However, a comment won't have its status or assignees.
When you select to create a subtask it will create a subtask of the original task. The subtask does have its status and can have assignees.
If you would like to view your task directly in Wrike there is a "Copy Task URL" button at the top. This will give you a URL directly to the task that you can paste into a browser. You will also be able to find the task on your “To-Do” list if it is assigned to you or does not have an assignee.
Overall, Wrike is a great project management tool, and this Outlook add-in assists users with keeping track of their tasks. If you would like advice regarding your project management process, you can contact us at 800-880-1960 or email info@toplineresults.com.
You must be logged in to post a comment.