
Have you seen some changes to your Dynamics 365 Online database recently? Maybe some changes to the look and feel of your forms for your different records? New icons around view names in the view selection window?
The debut of Microsoft Dynamics 365 2022 release wave 2 updates is upon us! One of the major changes in this update was to the Advanced Find functionality. In this blog, we will explain how to use the new, modern Advanced Find feature.
One thing you may notice is that the classic funnel icon may no longer be available at the top right corner of the screen anymore.
![]() If you still see the classic funnel icon, selecting that icon will take you to the new functionality listed below and will perform as outlined.
If you still see the classic funnel icon, selecting that icon will take you to the new functionality listed below and will perform as outlined.
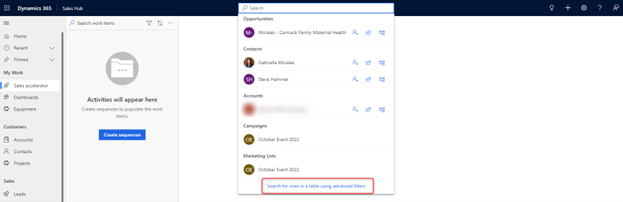
If you don’t see it, where did Microsoft move the Advanced Find functionality? To find it, select the Global Search bar at the top of your screen. This will open a window of recent records you have used. At the very bottom of this window, you will see the new option that states “Search for rows in a table using advanced filters”.
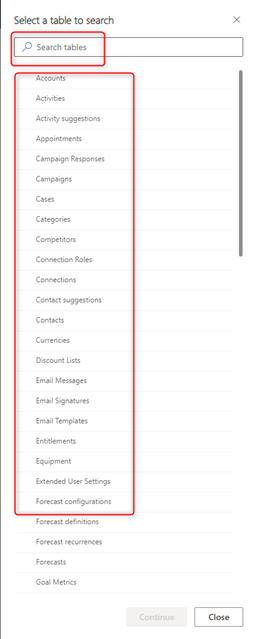
Selecting this option will open a new window that allows you to select a table in Dynamics 365 that you can use to filter information. Within this window, you can search for specific tables using the Search bar at the top of this window. Once you have located the table you would like to filter your data on, select that table and hit continue.
After selecting continue, you will notice that a view will open on your screen for the table you have selected. Note: All Advanced Finds are now based on your default view for the table (aka record type) selected. If you are looking to use Advanced Find based on a different view, you will need to update it to be your default view, then proceed to use advanced find filters.
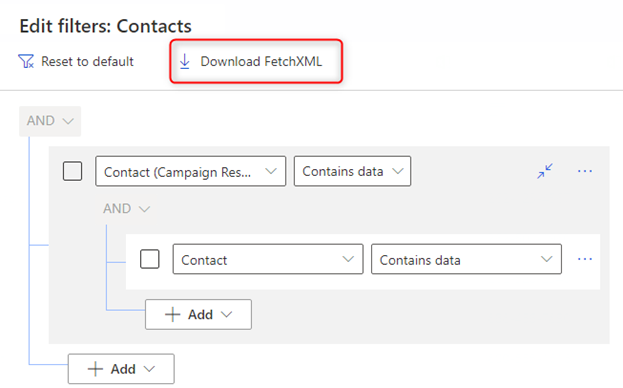
You will also notice a new window has appeared on the right side of the screen. These are the filters that are set for this default view. From this window, you can change the filters to match the criteria you are looking for. Note: You cannot change columns for this view at this time. From this window, if need be, you can download FetchXML as well for other functionality for the Dynamics 365 system.
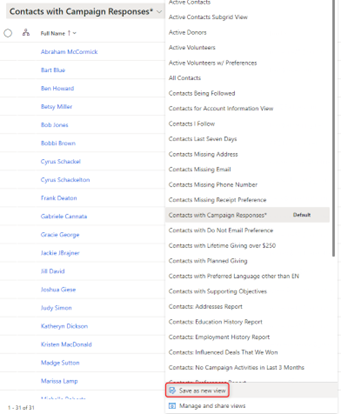
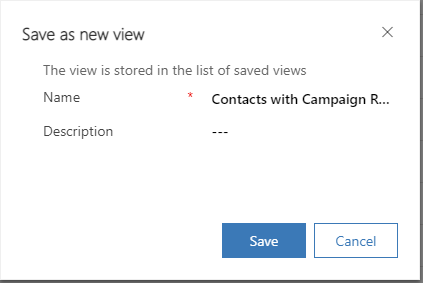
After you have made all your changes to the filters, you can hit the “Apply” button at the bottom of this window. From here, you will be taken back to your view, and you will notice a star/asterisk next to the name of the view. This signifies that a change in the filter has been made, and the view needs to be saved. To save the view, from the view selection window, at the bottom we will now see an option to “Save as new view”.
Selecting this will open a new window that allows the view to be renamed.
On a final note, you can edit columns for this view by selecting the Edit columns button at the top right corner of the view. This is where you can adjust or add new columns to the view to make the view your own. After doing this, you can run the “Save as new view” action and save the view in the system.
If you have any further questions about this new functionality or any other Microsoft Dynamics 365 feature, please feel free to reach out to info@toplineresults.com or call 800-880-1960.
You must be logged in to post a comment.