Dynamics 365 is a wonderful and robust system, but it can be a challenging process to unlock its full capabilities. The feature we’re going to focus on for this article is workflows. Workflows are automations to assist your business with streamlined processes.
The heart of an automation is the trigger, which initially sets off the automation to perform the desired action. Once a workflow is triggered, it will run through the “if conditions” you have established. If a condition is met, it will trigger the workflow and start the automation. You can also have the workflow trigger other workflows or have them all linked together to enact more complex actions.
Now that we understand some of the concepts behind D365 workflows, let’s get into creating a basic workflow for emailing an alert to your teammate that a new lead was created.
Creating the workflow for email alerts
This workflow example is for how to notify a sales colleague when marketing adds a new lead to Dynamics 365.
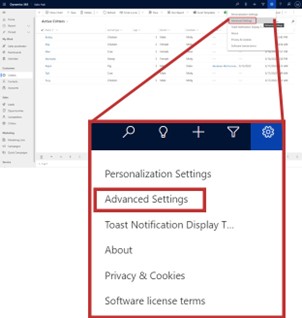
Select Gear icon
Go to Advance settings
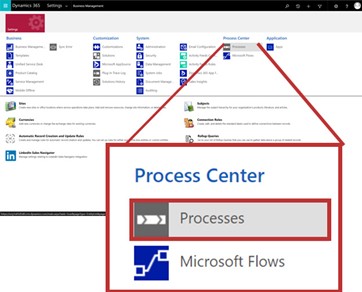
Click Processes
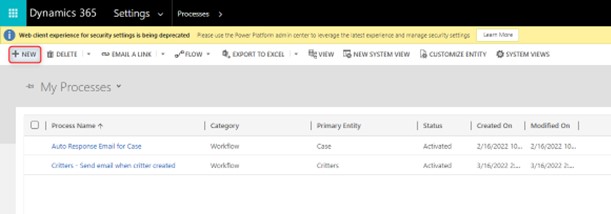
Click on New
After clicking on new, a pop-up will open. (Make sure to turn off pop-up protection for this site.)
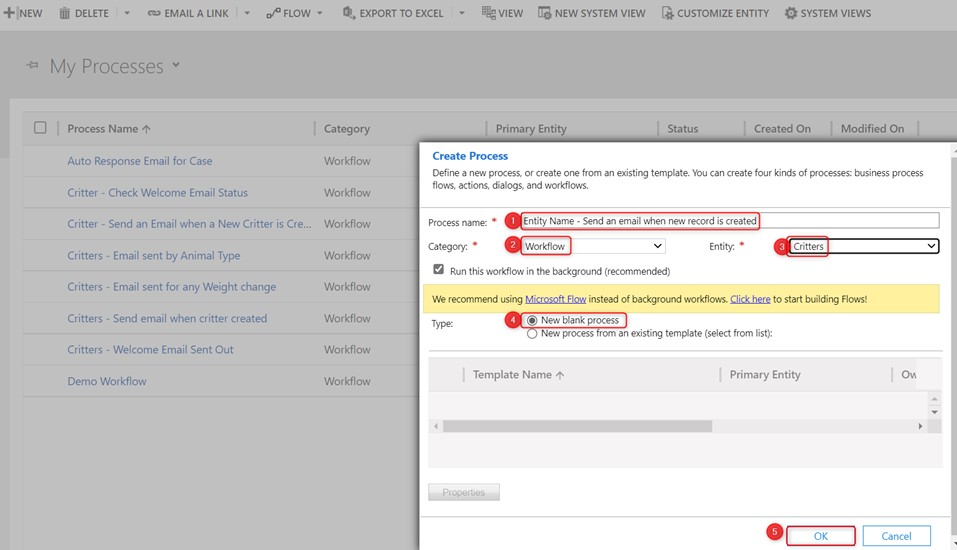
The “Create Process” form will appear. You will need to fill out the following:
- Process name: Type in the name of the entity you will be using and give a quick description of what the workflow does
- Category: Select Workflow
- Entity: The entity you want the workflow to automate
- New blank process
- OK to move on to the next pop-up window
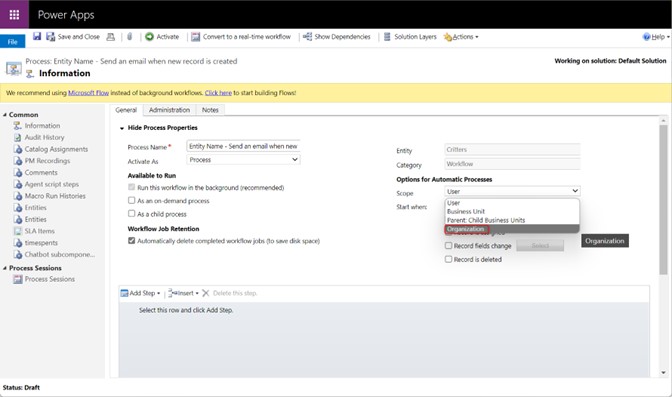
You will want to select “organization” to enable the workflow for your entire team. If left on “User”, only you will be able to see and use that workflow.
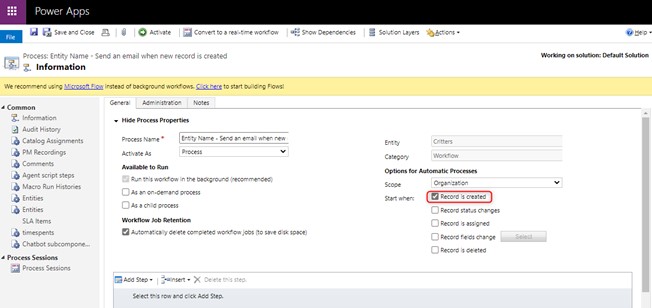
This is where you set “when” the trigger will go off. In this case, we want the email sent to us as soon as a record is created.
Next, you will create the steps of the workflow that will trigger once the “if condition” is met.
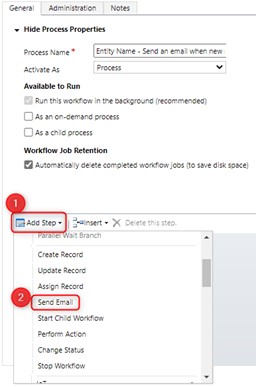
- Select “Add Step”
- In the drop-down select “Send Email”
Once the drop-down menu is done you can proceed:
- Add a quick description of the condition
- Select “Set Properties” to set up the parameters for your email alert.
A new pop-up window will appear.
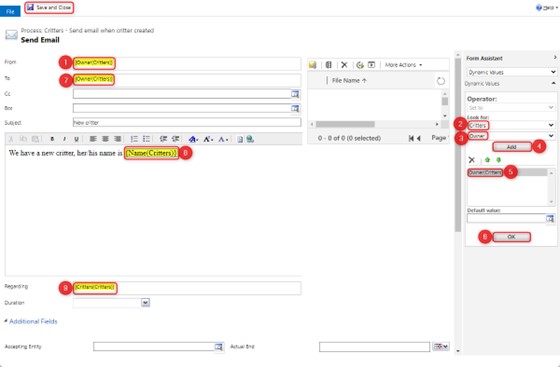
In this form, we will be setting the email sent to the “Owner” (i.e., the creator of the workflow) for the from and to fields. On the right is our dynamic values and how we add these yellow highlighted areas.
- Click on the “From” field and then go to the Dynamic values (Far right) to enter a value.
- In the Dynamic Values, make sure to have your entity selected.
- From the next drop-down menu, you will want the Owner.
- You will add the value to the option selector below the add button.
- Select the “Owner (Critters)”.
- Press “OK” to add “Owner (Critters)” to the “From” field to the left.
- Click on the “To” field and repeat the same process to fill in the “From” field (2 – 6).
- You can add the contact record names by using the Dynamic values again and in #3 select “Name” and then repeat 4 – 6 to add the value to your email.
- This field is automatically filled for you.
After completing these steps, you now should have a fully working workflow for sending an email whenever a new record is created in that entity you have selected.
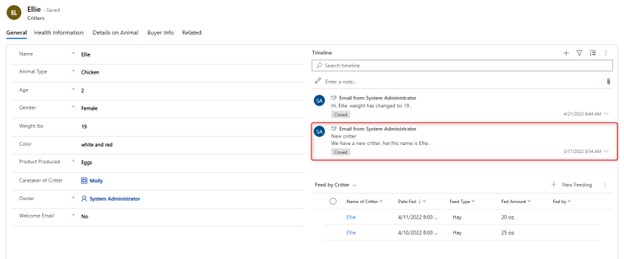
Now every time you create a new record it will create an email and show up on the record’s Timeline like below:
Hope this will help you and your team to start automating your CRM. TopLine Results is always willing to help and teach our clients the power of CRMs. Let us assist you with creating a streamlined and clear process for your business.
If you need help or would like more details on our services, please contact us at info@toplineresults.com or visit our website at Toplineresults.com



You must be logged in to post a comment.