
In your everyday tasks, it’s important to keep an organized workflow. Sometimes, keeping processes in line while working with different apps, services, files, and other data can get a bit messy. That’s where Microsoft’s Power Automate tool comes in handy. Power Automate is a service that helps you create automated workflows to synchronize files, get notifications, and collect data.
Power Automate can help you automate business processes, send automatic reminders for tasks, move data between systems on a set schedule, and more!
Power Automate can even read the contents of certain file formats automatically from an email. For example, Power Automate can read the contents of a csv file that is received via email.
There are multiple steps to get this to work. Here is the complete flow:
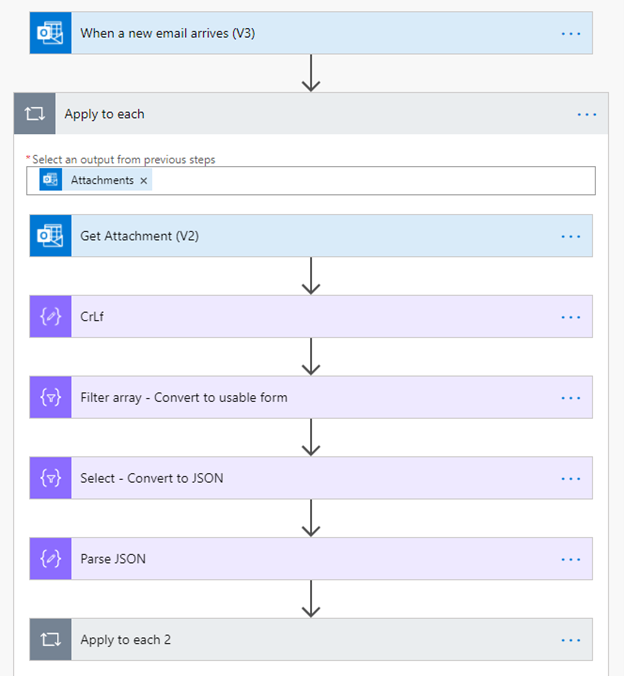
The first few steps are pretty straightforward. They just involve a trigger for when an email arrives and then looping through each of the attachments within that email.
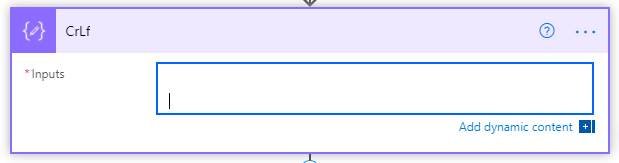
The CrLf step is a Compose action. Just add a compose action and then within the Inputs box, press Enter to add a new line. We use this to split apart the csv file by row in the future.
The Filter array – Convert to usable form step takes the contents of the attachment file and converts it into something that is usable.
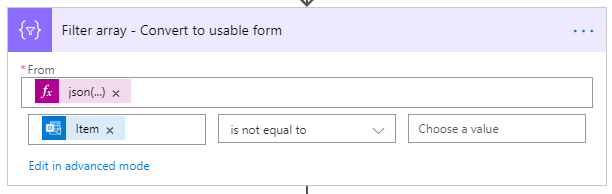
The “From” box should contain something like this,
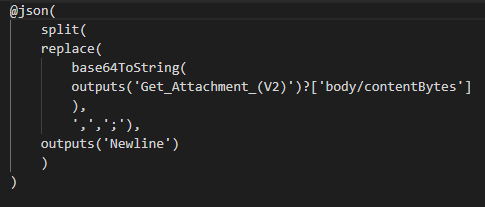
This takes the contents of the attachment and does the following:
- First it converts it from base64 to a string.
- It replaces all commas with semi-colons. This can be changed to any unique character and can help if you have a different delimiter.
- It splits the string by row. Since a csv file contains one record per row, we need to split the string by row.
- It converts the data into json format.
The second line should be an expression where you simply type Item() into the expression box. Click on the “Edit in advanced mode” link, and the second line should say @not(equals(item(), ''))
The next step is Select – Convert to JSON
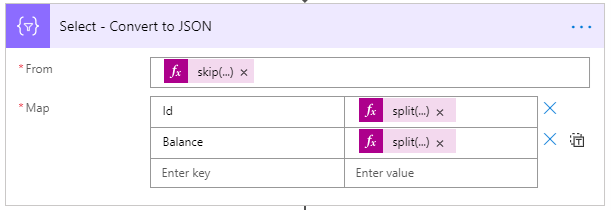
The From box is just this:
skip(body('Filter_array_-_Convert_to_usable_form'), 1)
This line is the input for our json mapping. We skip the first line because it’s the header row.
The Map is simply mapping the columns in the csv file to our new json. The expression is simply splitting the row by semi-colon and then pulling the appropriate index from the resulting array.
split(item(),';')[0]
split(item(),';')[1]
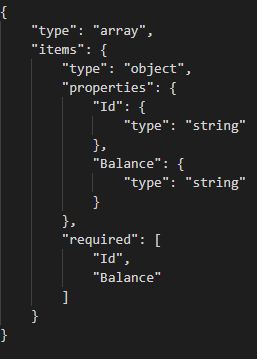
The final step is simply Parse JSON
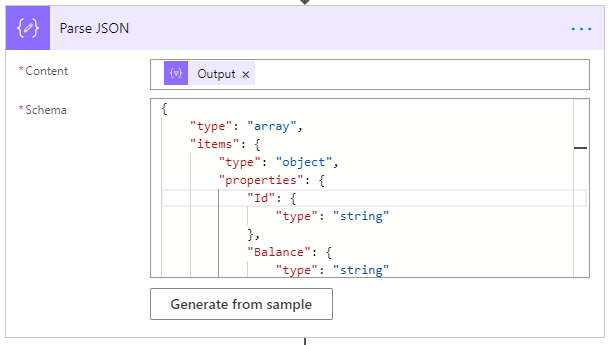
This may be a bit redundant because you already have your json from the previous step, but I found that this gave me better control over the resulting json. The Content is simply the output from the previous step (the Select – Convert to JSON). I generated the schema from a sample. I simply ran the flow as a test and then pulled the output from the previous step and used that as a sample. Here’s what I got for the schema:
The rest of the flow is simply looping through your JSON and taking whatever action you want on each item.
The key to getting this to work is to make sure that you have a very clean csv file with no oddities. Keep your file very consistent as this method doesn’t take into account the full specification for proper csv file formatting. This example is only a starting point and may require considerable tweaking to account for your specific needs.
If you need assistance with complex business solutions like this, contact TopLine Results (info@toplineresults.com or 1-800-880-1960) and we’ll be happy to review your requirements and assist you.
To learn more about Microsoft Power Automate, visit here.
Leave a comment!
You must be logged in to post a comment.